19. huhtikuuta 2015

Wanted: testers!

Nyt olis haussa testineulojia Ruusa neuletakille RavelrynFPT:ssä (linkki suoraan mun ohjeeseen). Tästä linkistä lisää ryhmän säännöistä.


Looking for test knitters for Ruusa Cardigan at Ralvelrys FPT group. More about group rules here.

8. huhtikuuta 2015

Ruusa villatakki

Eka versio on neulottu, pingotettu, päärmeet ja napit ommeltu:


Valmiin takin myötä huomasin pari kohtaa, jotka voisi tehdä toisin, paremmin ja siistimmin… eli vaikka tämäkin versio pääsee (on jo päässyt) aktiivikäyttöön, niin se ei ole ihan mun vaatimuksia vastaava.


Ohjetta ja kaavioita olen viilannut useampaan kertaan sekä mallitilkkuillut kaarroketta suurempiin kokoihin. Suurimman koon lyhennetyt kerrokset yhdessä kirjoneuleen kanssa eivät halunneet toimia mun laskutoimituksilla alkuunkaan, kunnes äkkäsin ihan typerän kikan. Typerän, koska harmittaa että olisi ollut niin helppoa älytä se ennen kuin purin ja neuloin kaarrokkeen uudelleen SEITSEMÄÄN kertaan. Kahdeksannella kerralla onnistui kikan avulla ja nyt työ jatkuukin ihan kokonaiseksi takiksi asti.


Langat on jo myös tilattu siihen lopulliseen versioon, joka tikutellaan kaikkien taiteen sääntöjen ja tarkasti ohjeen mukaan. Sormia oikein syyhyä jo päästä varsinaisen langan kimppuun! – Ja sitten pitäisi vielä aloittaa muutama uusi versio, koska tämä projekti poiki jo jatkoidean! ;D

Ruusa Cardigan


The first version of Ruusa Cardigan is finished; knitted, blocked, hemmed and buttons sewed:


After finishing this version, I discovered some things that could be made in other, better and nester ways… so even if this version has already been in use, it doesn’t really meet my high standards.


I have worked further with the pattern, text and charts, and swatched the yoke for bigger sizes. I had some trouble getting the short rows to match my calculations for the biggest sizes and did knit and rip the yoke for SEVEN times until I got it finally right. So this time eight time’s the charm.


I’ve also ordered the yarns for my final version that will be done exactly by the pattern with no more adjustments. My fingers are already tickling and I can’t wait to get to work! – Oh and I should also start, yet again, few more new versions since this project beard an extended idea ;D

6. huhtikuuta 2015

About body types

In my body hugging patterns I usually use several shaping alternatives to able knitters to adjust the pattern to fit their own body. I refer to different letters when describing the body types in the patterns. It’s shorter to refer to one letter than the full name with long descriptions.

The five most common body types are:

X-body alias hourglass – The upper body and the hips are approximately the same width and with a distinct waist definition.
  • bust about the same width as the hip-line
  • defined waist

A-body alias pear – The upper body is smaller than your hips and with a waist definition.well defined waist
  • bust and shoulders are proportionally narrower than hip-line
  • thighs and but might be full and round

H-body alias rectangular – Upper body and the hips are the same width and with really small waist definition.
  • bust and shoulders about the same width as the hip-line
  • little or no waist definition

Y-body alias inverted triangle – Upper body is wider than the hips and with small waist definition.shoulders wider than your hips
  • hips are narrow
  • flat but

O-body alias apple – Upper body is wider than the hips and with absolutely no waist definition.wide around the waistline
  • no waist definition
  • hips and but might be full along with waist
  • bust, waist and hips are very close in measurements

These body types are generalizations and means. And of course not everybody fits to these body types. – I’m a good example of someone who doesn't fit exactly to any of the general body types. Why? I have wide shoulders, almost no boobs, distinct waist and wide hips. I don’t fit to the X-body because I don’t have boobs, even though from distance my body might look like it would be an hourglass. So I’m a mix of body types Y and A with special feature of having my real waist, the narrowest part of my torso, right below my nonexistent boobs. Oh and then I have a swayback and one side of my hips is much fuller then the other…

Luckily knitted garments stretch and are very forgiving to our imperfect yet gorgeous bodies!

I don’t include all the body types to every pattern, but do often include at least shaping alternatives for the bust and for a swayback (entirely for personal reasons). Pattern description tells you if the pattern includes shaping alternatives.

31. maaliskuuta 2015

Muhkujakku

Ehdinpäs vielä tän kuun puolella julkaisemaan seuraavan ohjeen: muhkean neuletakin, joka valmistuu nopeasti ”muhkulla” langalla ja suurilla puikoilla. Aamutuimaan kuvasin vielä uudet, asteen verran selkeämmät kuvat neuleesta:
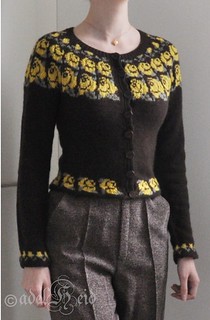

Muhkujakku neulotaan täysin saumattomasti ylhäältä alas. Erittäin syvää v-pääntietä, helmaa sekä kalvosimia kiertää palmikkoreunus, joka on näyttävyydestään huolimatta yksinkertainen. Kiinnityksenä on kolme suurta nappia.


KOOT: XS – S – M – L – XL – XXL – 3XL
VALMIIN TYÖN MITAT: Valmiin neuleen vartalon ympärys n. 70 – 80 – 90 – 100 – 110 – 120 – 130 cm, hauiksen ympärys 26 – 28 – 30 – 33 – 35 – 39 – 41 cm
LANKA: aran paksuinen lanka, jonka juoksevuus on n. 150 - 180 m/100 g (wpi 8) 
LANGAN KULUTUS: n. 800 – 900 – 1020 1155 – 1300 1470 – 1670 m 
TIHEYS: 10 x 10 cm = 16 s ja 22 krs
VAIKEUSLUOKITUS: keskiverto
TEKNIIKAT: väliaikainen virkkausaloitus, lyhennetyt kerrokset, kaavio
PUIKOT: 4,5 mm pyöröpuikot, tai käsialan mukaan

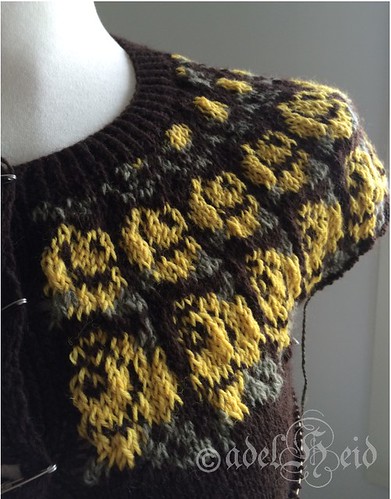
OHJE OSTETTAVISSA RAVELRY KAUPASTANI! - 5 €  Mistä löytyy myös lisää yksityiskohtaisempia kuvia sekä tasokuva mittoineen.


Muhku Cardigan


Muhku is a Finnish slang word to describe chunky, bulky, voluminous… just what this cardigan is.

Especially in the winter it’s cozy to snuggle up in to a big and chunky, warm cardigan. During spring and fall this cardigan can be used instead of an over coat.

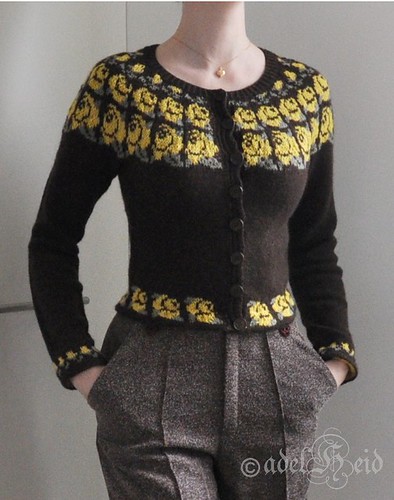
With big needles and thick yarn this cardigan is quickly done. It’s worked top down without any seams. The details are simple, yet showy cables all around the neckline and hem as well as the cuffs. The neckline is really deep and the cardigan is closed with three big buttons.


SIZES: XS – S – M – L – XL – XXL – 3XL
FINISHED MEASUREMENTS: bust circumference 70 – 80 – 90 – 100 – 110 – 120 – 130 cm (28 – 32 – 36 – 40 – 44 – 48 - 52”), bicep circumference 26 – 28 – 30 – 33 – 35 – 39 – 41 cm (10.5 – 11 – 12 – 13 – 14 – 15.5 – 16”)
YARN WEIGHT: aran (8 wpi)
MATERIALS:
about 900 – 1020 – 1155 – 1300 – 1470 m (985 – 1115 – 1263 – 1422 – 1608 yd)
NEEDLES: 4.5 mm (US 7) or a size to obtain gauge
GAUGE: 10 x 10 cm = 16 sts and 22 rows
SKILL LEVEL: intermediate
TECHNIQUES: provisional cast on, short rows
, cable chart

PATTERN AVAILABLE IN MY RAVELRY STORE! - 5 €  Where you can also find more pictures of the details as well as a schematic.

26. maaliskuuta 2015

Ruusa työn alla

Yhden valmistuneen tuotteen takana voi olla monta inspiraation lähdettä. Itse prosessi siksi valmiiksi tuotteeksi ei ole ihan tuosta vaan rykäisty ja kyhätty kasaan, koska lasken valmiiksi tuotteeksi sen ohjeen.

Ruusaan sain idean monesta eri paikasta, jotka sitten pikkuhiljaa nivoutuivat kasaan mun päässä neuletakiksi. Idean eka poikanen oli Puikkomaisterin mysteerisukat, joiden ruusukuviot ihastuttivat. Seuraava lähde oli Tukuwoolin Facebook-haaste: minkä mallin neuloisit merkin langoista ja mistä väristä? Ihana värimaailma kutkutteli aivonystyröitäni ja rupesin hahmottelemaan kirjoneuletta… ja sinnehän hypähti mukaan nuo ruusukuviot. Itse lankaa piti jo käydä paijaamassa lankaliikkeessä ja päätös tuli tehtyä: tästä langasta pitää ehdottomasti tehdä ruusuinen kirjoneule.


Seuraavaksi surffailin netistä onko ”mun idea” jo toteutettu? En ainakaan löytänyt mitään lähellekään päässäni pyörivää kuvaa, vaikka kivoja kirjoneuleita kukkakuvioilla löytyikin. Sellaista mun näköistä ei tullut vastaan eli tämä idea piti ehdottomasti toteuttaa: lyhyt villatakki pyöreällä kaarrokkeella, jossa ruusut puhkeavat hiljalleen kukkaan.


Mulla ei ole hirveästi kokemusta pyöreistä kaarrokkeista eli pieni opiskelun paikka oli tarpeen: kotikirjastosta hyvä tekniikkakirja käteen sekä valmiiden ohjeiden tutkimista, mallitilkkuilua ja silmukoiden laskemista, näiden yhdistäminen kokotaulukoihin, sarjominen useampaan kokoon… ja kaiken tämän sovittaminen kirjoneulekaavioon. Kirjoneuletta varten etsin netistä ristipistotöitä ruusuista, joiden pohjalta kyhäsin kasaan neljä erilaista kuviota. Kaaviot tuhersin ruutupaperille, korjailin ja merkkailin useampaan kertaan kun kuvio ei sopinut silmukkamääriin ja tuhersin uuden version puhtaalle paperille ennen kuin loin silmukat puikolle.


Eka versio neuletakista syntyy varastolangoista; ylijäämää yhdestä äidin projektista, jota olen itse asiassa käyttänyt jo aikaisemminkin toiseen projektiin (riittoisaa lankaa), ylijäämää kahdesta omasta projektista (jälleen riittoisaa lankaa) sekä kasvivärjättyä vuosikertapurkulankaa. Iskin ensin varastolankojen kimppuun, kun en varmasti tiedä paljonko tarvitsen Tukuwoolin Fingering lankaa. Eli teen ensin proton, josta saan tarvittavan lankamäärän ja vasta sen jälkeen tilaan sen varsinaisen langan.


Proton aikana kirjoitan tarkemman ohjeen raakileen sekä korjailen edelleen kirjoneulekaaviota. Vasta neulottaessa huomaa ettei kuvio toimikaan neuleena ihan yhtä hyvin kuin mun ruksit ruutupaperilla eli tiedossa on vielä kaavion viilausta.


Hetki sitten projekti näytti tältä (tämähän on jo taas edistynyt kuvan ottamisen jälkeen):


Kuvassa yli puolet jäljellä vielä neuletyöstä, mukaan lukien vielä uudet kaaviot helmaan ja hihansuihin. Puhumattakaan vielä kaikista niistä eri työvaiheista jotka pitää tehdä ennen kuin itse ohje on julkaisuvalmis: proto valmiiksi -> tarvittavan lankamäärän laskeminen ja materiaalin tilaus -> ohjeen oikoluku ja tekninen editointi -> testineulonta -> takin neulominen varsinaisesta langasta sekä viimeistely -> tuotekuvaus -> testineulonnan palautteiden käsittely ja ohjeen viimeistely -> ohjeen layout. Ja sitten vasta pääsen julkaisemaan valmiin tuotteen: Ruusa neuletakin -ohjeen.


Ruusa under work


One finished item can have several sources for inspiration. And the whole process from idea to a finished object isn’t that quick either. Especially when I consider a pattern being the finished product.


My idea for Ruusa came from several sources that slowly united in my head to a cardigan. I got my first impulse from mystery socks by Puikkomaisteri; I got smitten by the really pretty rose pattern. The next source was a Facebook challenge/raffle: which pattern would you like to make from Tukuwool Fingering yarn and in witch colour? The lovely color scheme tickled my brain and I just had to start drafting stranded knitting motifs… and the roses jumped along. I had to go to a LYS and stroke the yarn… and the decision was done: I have to make a rosy stranded knit from this yarn.


My next step was surfing online and searching if “my idea” was already executed? I didn’t find anything even close to what I had in my mind, even though there are already nice flowery patterns. But there isn’t a one that looks like me, so I definitely have to fulfill it: cropped cardigan with circular yoke where the roses start to blossom.


I don’t have that much experience with circular yokes so a little study was in order: a good technique book from my home library as well as studying existing patterns, swatching and counting stitches, combining calculations to size charts and grading… and adapting all of this to a chart of stranded knit. For the flower motifs I searched some cross-stitch patterns for roses and based on them I drew four different patterns. I scrawled rose charts on squared paper, retouched and tinkered several times since the pattern didn’t fit the stitch count.


The first version of the cardigan I’m making from stash yarns; leftovers from both mums and mine previous projects as well as natural dyed recycled vintage yarn. I’ll do the first version from stash yarns since I’m not so sure of how much I’ll need of the actual yarn.


While working with the first version of the cardigan I’ll be writing up the pattern and adjusting the chart even more. Only after casting on and working with the chart I’ve come to realize that the pattern doesn’t work in knitting as good as it did on the paper.


A while ago the project looked like this (I’ve made more progress after taking the picture):