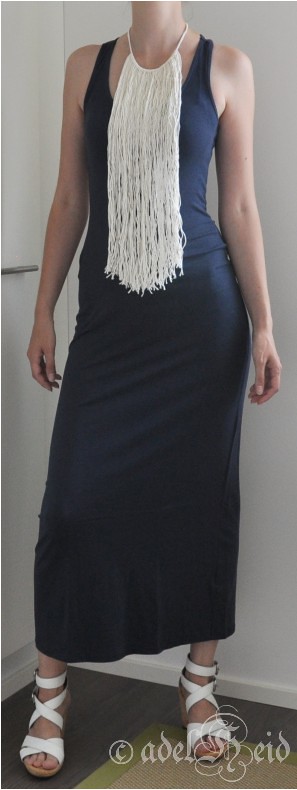
Näytetään tekstit, joissa on tunniste tutorial(ish). Näytä kaikki tekstit

13. maaliskuuta 2021

My favorite techniques: Intarsia in the round

Abbreviations for this post:

EOR = end of row/round

PUW = pick up wrap and K/P it tog with wrapped st

Observe that I prefer to use Japanese W&T (can be found in a previous post as Japanese short rows).


There are at least two ways of working intarsia in the round… but my favorite is this one where you work the different colours in their own sections:


On RS: K until 1 st to EOR and PUW. W&T and cont to P. – My PUW on RS is ssk, where 1st slipped st is the last st of the round and the 2nd slipped st is the wrap st from the previous round.

On WS: P until 1 st to EOR and PUW. W&T and cont to K. – My PUW on WS is P2tog.

20. helmikuuta 2021

My favorite techniques: Intarsia

Back in 2013 I got an idea that challenged me to learn a new knitting technique: intarsia. The blog post about it is here. – And I fell in love with the technique and all the possibilities it gave me for designing.

Since that first project I’ve made few intarsia designs that I’m still pretty proud of: my all time favorite “Still Panda” that combines Veera Välimäkis pattern Still Light and my own motif from Panda.

Another one that I’m still very proud of is “Pikselimössö” (that is still on the draft board…). My craziest idea so far and you can see on my Ravelry project page why it still is a crazy idea with all the bobbins :D

But who knows how many more crazy intarsia ideas I still get with a quite an easy technique at the end of the day. Check this video and see for yourself that intarsia isn’t that hard:


On RS: K until colour change; cross the two yarns in the back of work (WS of work) and cont to K with new colour.

On WS: P until colour change; cross the two yarns in front of work (WS of work) and cont to P with new colour.

19. helmikuuta 2021

My favorite techniques: Japanese short rows

I’ve only recently discovered and felled in love with the Japanese way of making short rows. There’s not any big different to the more common W&T, where you wrap yarn around the next stitch. But for my loose knitting the Japanese style makes a neater outcome: instead of wrapping yarn around the next stitch, you’ll wrap the yarn around the needle.

Japanese short rows on RS

On RS of your work you’ll K to the turning point, turn work, wrap the yarn around RH needle and cont to P. – When working wrapped sts tog you’ll K2tog with the st on the left side of the wrapped st.

Japanese short rows on WS

On WS of your work you’ll P to the turning point, turn work and wrap the yarn around RH needle and cont to K. – When working wrapped sts tog you’ll make a ssp with the st on the left side of the wrapped st.

I’ve figured out that this style works with my loose knitting ‘cause it keeps my yarn tension constant.

16. helmikuuta 2021

My favorite techniques: twisted rib

 I’ve been a long time fan for twisted rib. I prefer it simply because it gives a nice and stretchy, yet a firm edge for knits. And in my opinion a twisted rib recovers best its original shape after stretching.

Twisted rib with K1tbl, P1tbl sts:


Twisted rib in a yarn with a tight spin might not feel as nice against your skin as in a yarn with a looser spin. To avoid this kind of uncomfortable detail I usually knit twisted rib for sock and sleeve cuffs, that comes tight against your sensitive skin, with a “twist”: on RS rep *K1tbl, P1* and on WS rep *K1, P1tbl*:


This way stitches on WS are a bit softer and smoother against the skin.

28. tammikuuta 2021

My favorite techniques: M1R and M1L

There is at least few ways of making one stitch when adding stitches in a knit (like knitting in the stitch below and knitting a stitch from front and back etc.), but my favorites are:

M1R (make one right)

Pick up yarn from behind between sts to left hand needle and K through front loop. This makes a right leaning stitch.

M1L (make one left)

Pick up yarn from front between sts to left hand needle and K through back loop. This makes a left leaning stitch.

I like the look of these techniques; how the stitches smoothly blend to the knitted surface and how they are easily spotted if you’re in need of counting the added stitches for example. These leaning stitches also gives you a chance to play with the structure of the stitches:

In this picture above I’ve worked “K until SM, M1L, sm, K to EOR” and in the picture below I’ve worked “K until SM, sm, M1L and K to EOR”.

My favorite is definitely the latter one. In my eyes it’s a teeny tiny bit of neater outcome.

24. tammikuuta 2021

My favorite techniques: Figure 8 CO

 I’ve been testing all kinds of knitting techniques during the years. And I love to test new ones in search of the perfect ones for me and my designs. Though I have already found some of my absolute favorites… that I will share with you in some upcoming blog posts.

The first technique I’m sharing with you is my favorite when casting on toe up socks:

Figure 8 Cast On


The CO is made with circular needles holding them parallel and wrapping the yarn in figure 8 around the needles. Leaving a short tail of the yarn wrap it around the upper needle and work the yarn alternately around and between the needles. Continue wrapping a figure 8 around the needles until you have the desired number of sts, ending with a bottom loop. You’ll now have an equal number of sts on both needles. The CO is ready only after working once the sts on the 2nd needle: rotate the needles so you’re holding them with your left hand and pull the bottom needle through the sts so that they’re on the cable. With the right hand needle K the first st of left hand needle and K the following sts tbl. Now the CO is ready.

18. toukokuuta 2020

Tubular Bind Off for 1 x 1 ribbing


My favorite BO has been for quite some time already Tubular BO. Definitely my “go to” when working with 1 x 1 ribbing. I favor it because it makes a firm, yet a really stretchy edge.

For making a Tubular BO I reserve a yarn tail that is at least 2.5 times the length of the stretched edge. Usually I reserve 3 times the length to be absolutely sure I have enough yarn for the BO.


Because the yarn tail is long and gets easily tangled, I thread it in double through the needle. Now the tail is a bit easier to manage.


I always start the Tubular BO on the RS of the work and with a K st. The first two sts are set-up sts before starting with the actual BO repeat: thread the darning needle through the first K st from back to front, bring then the needle between K and P sts from back to front and then thread the needle through the first P st from front to back.

Now the first two sts are ready for the Tubular BO repeat:
1. Thread the needle through first K st from front to back and sl st of the needle. Pass by P st and cont to thread the needle on RS through the second K st from back to front. Tighten the yarn.
2. Tread the needle through first P st from back to front and sl st from the needle. Pass by K st and cont to thread the needle from BS between K and P st to the front and then through the second P st from front to back. Tighten the yarn.


It takes a while to learn this BO, but I’ve gotten help from a simple “mantra”: thread K sts from front to back and again from back to front, and thread P sts from back to front and again from front to back.


To make a neat ending for in the round ribbing, BO the last two sts as follows: thread the needle through the last K st on the needle from front to back and sl st of the needle. Pass by the last P st and thread the needle on RS through the next K st (the first K st where the whole BO rnd started) from back to front. Thread the needle through the last P st on the needle from back to front and sl st from the needle. Pass by previous K st and thread needle through the next P st (the first P sts where the whole BO rnd started) from front to back.


Weave in end on WS of the work.

The ribbing edge is now really stretchy, yet firm and looks neat:

18. syyskuuta 2015

Centimeters instead of age

Based mainly on my own experiences while working with children’s clothing for over six years, this post is about sizing on my patterns for children: why do I use height instead of age?

Since children grow with absolutely no logic and definitely not after any average sizing standards, I use the height for sizing. That is the common way of marking clothing sizes for children here in Finland. – It is quite ridiculous to mark sizes by age since it’s impossible for all the children to have reached an average height by a certain age. It’s really rare that a child would fit the average size tables. Especially here in Finland it’s more of a rule than an exception that the children are much taller than on the average size tables. E.g. I’ve met 130 cm tall 6 year old children who should according to size tables be about 8-9 years old by their height!

I’ve made my own size table for my children’s patterns where you can find the vital measurements and what is considered to be the average age of a particular size. The table can be found here.

10. elokuuta 2015

Kirjoneulevinkkejä / Tips for stranded knitting

Mun neuletyöt on viime aikoina käsittänyt pääasiassa kirjoneuleita ja ajattelin jakaa muutaman vinkin siitä miten ainakin minä saan jäljestä siistin ja tasaisemman jo itse neulomisen aikana. Näitä kaikkia kikkoja olen siis käyttänyt mm. Ruusa neuletakkiin, Lamatakkiin ja Siipirikkoon. / My knitting has lately been mainly stranded knitting and I thought I would share some tips on how I get the work to look a bit neater already when knitting. These are all tips that I’ve used e.g. with Ruusa Cardigan, Lamatakki and Siipirikko.

Jos työhön tulee kirjoneuleen lisäksi yksiväristä sileää neuletta, neulon kirjoneuleosuuden useimmiten 0,5-1 mm suuremmilla puikoilla kuin yksinvärisen osuuden. Tämä tasoittaa jo jonkin verran kahden eri tekniikan tiheyttä. Sen lisäksi käytän työstä riippuen seuraavia kikkoja / If my stranded work have also plain colour, I work the stranded part with 0.5-1 mm bigger needles. This evens out the tension of two different techniques. In addition I use, depending of the work, following tips:

SILMUKOIDEN VENYTTÄMINEN – neulottuani n. 8-10 s, ”venytän” ne oikealle puikolle levittäen niin pitkälle kuin lanka/langanjuoksut antaa myöden.

STRETCHING THE STITCHES – after working about 8-10 sts, I ”stretch” them on the right hand needle by spreading them on the needle within the yarn/strands.

NURINKURIN / INSIDE OUT


Suljetussa työssä käännän työn nurjan puolen ulos ja neulon ympyrän sisäreunasta, jolloin langanjuoksut jäävät ympyrän ulkopuolelle ja automaattisesti hieman löysemmiksi. Seuraavassa minivideossa näkyy miten neulominen onnistuu työn sisäreunasta:

When working in the round, I turn the work inside out and work from the inner circle. This way the strands are left to the outside circle and get automatically a bit looser. In the following mini video you can see how to knit from the inner circle of the work:


LANGANJUOKSUN SITOMINEN – tasoneuleessa sidon langanjuoksut joko muutaman silmukan päähän siitä mistä väriä edellisen kerran käytettiin tai jos kirjoneule jatkuu koko kerroksen, niin silmukkaa ennen kerroksen loppua. Tässä venytän neuletta puikolla vielä erikseen, etteivät langanjuoksut varmasti kiristä käännyttäessä taas neulomaan vastakkaiseen suuntaan.


WRAPPING STRANDS – when working flat, I either wrap the strand after few sts from where it was used or if working stranded throughout the whole row; one st before end of row. I also stretch the sts so that the strands won’t get tight when turning and working to the opposite direction.

INTARSIA – esim. yksivärisen napituslistan reunan saa siistimmäksi neulomalla se intarsiana niin, että kirjoneuleen kaikki langat sidotaan napituslistan langalla.


INTARSIA – to make sure that the edge of e.g. placket and stranded part stays neat, I work them in intarsia so that all the yarns from stranded part are twisted with the placket yarn.

17. toukokuuta 2015

Salsahame

Kevään ja lisääntyvän valon myötä iskee myös aina ompeluhimo! Mikäs sen mukavampaa kuin päivittää vaatekaappiin, omaan tai jonkun toiseen, uutta kevät ja kesä ”lookkia”.

Tein vuosia sitten kirpparilla mahtavan löydön: kolme megakokoista (3 m x 2,5 m) valoverhoa, joista olen saanut aikaiseksi jo mm. muumiodrapeeratun mekon, huivin, pari hörhelöhametta pienelle ihmisen alulle ja nyt salsahameen:


Hame on loppujen lopuksi tosi helppo toteuttaa: lantion mitta + hieman liikkumavaraa ja saumavarat sekä pituuteen kääntövara kuminauhalle, seuraavaan kaistaleeseen 50 cm lisää leveyttä ja seuraavaan kaistaleeseen taas 50 cm leveyttä jne. Mun kaavan kappaleet näyttivät tältä:


Kaistaleet ommellaan eka rinkuloiksi. Kaistaleen yläreunaan rypytyslangat joilla rypytetään sopimaan seuraavan kappaleen alareunaan. Kaistaleet yhteen. Yläreunaan kuja kuminauhalle ja helmaan päärme. Loppujen lopuksi todella yksinkertainen ja nopea homma. Aikaa vievin osuus on rypytyslangat, joista en ainakaan itse pidä yhtään…


Tähän versioon lisäsin vielä virkatun nauhan alimpaan kaistalesaumaan. Ja kangasta on muuten edelleen jäljellä!


Spring and the increasing light make me want to sew again!


Salsa skirt is really simple and easy to execute: add to your hip measurement some margin and seam allowance as well as allowance for a elastic band to the height, for the next strip you need to add 50 cm to the width and again to the next strip 50 cm more to the width etc. My pattern pieces looked like the drawing above.


First sew the strips to circles and running stitches to top edges. Ease the fabric along the thread to match the lower edge of the next strip and sew the strips together. Fold and sew the waistband for elastic and sew the hem.

6. huhtikuuta 2015

About body types

In my body hugging patterns I usually use several shaping alternatives to able knitters to adjust the pattern to fit their own body. I refer to different letters when describing the body types in the patterns. It’s shorter to refer to one letter than the full name with long descriptions.

The five most common body types are:

X-body alias hourglass – The upper body and the hips are approximately the same width and with a distinct waist definition.
  • bust about the same width as the hip-line
  • defined waist

A-body alias pear – The upper body is smaller than your hips and with a waist definition.well defined waist
  • bust and shoulders are proportionally narrower than hip-line
  • thighs and but might be full and round

H-body alias rectangular – Upper body and the hips are the same width and with really small waist definition.
  • bust and shoulders about the same width as the hip-line
  • little or no waist definition

Y-body alias inverted triangle – Upper body is wider than the hips and with small waist definition.shoulders wider than your hips
  • hips are narrow
  • flat but

O-body alias apple – Upper body is wider than the hips and with absolutely no waist definition.wide around the waistline
  • no waist definition
  • hips and but might be full along with waist
  • bust, waist and hips are very close in measurements

These body types are generalizations and means. And of course not everybody fits to these body types. – I’m a good example of someone who doesn't fit exactly to any of the general body types. Why? I have wide shoulders, almost no boobs, distinct waist and wide hips. I don’t fit to the X-body because I don’t have boobs, even though from distance my body might look like it would be an hourglass. So I’m a mix of body types Y and A with special feature of having my real waist, the narrowest part of my torso, right below my nonexistent boobs. Oh and then I have a swayback and one side of my hips is much fuller then the other…

Luckily knitted garments stretch and are very forgiving to our imperfect yet gorgeous bodies!

I don’t include all the body types to every pattern, but do often include at least shaping alternatives for the bust and for a swayback (entirely for personal reasons). Pattern description tells you if the pattern includes shaping alternatives.

28. heinäkuuta 2014

Hupsutteluhapsuttelua

Oon bongannut netistä jo useammasta paikkaa kivan näköisiä pitkiä hapsukaulakoruja; nahkahapsua, helmihapsuja, ketjuhapsuja jne. Oman version keksin aamulla värkätä jämälangasta!

Eka vanhasta Kotiväestä virkkasin kiinteillä silmukoilla "nyörin", jonka yhdessä päässä lenkki ja toisessa päässä nappi. Siihen suunnilleen keskivaiheille sidoin hapsuja, jotka olin eka kieputtanut tuolin jalkojen ympäri että sain suunnilleen samanpituiset. Kotiväen tarkkaa määrää en pistänyt ylös, mutta hapsuihin käyttämääni Katian Brisaa oli suunnilleen 30g.


Simppeliin lopputulokseen olen erittäin tyytyväinen:


Erittäin helppo ja nopea projekti. Tällaisen voisi vääntää vielä kirjavana versiona.


After scouting several versions of fringe necklaces around the internet, I did my own version this morning. First I crocheted the cordon with a loop in the one end and a button in the other end. And then I just tied the fringes to the cordon. The yarn for the fringes, I whirled round two chair legs to get them about the same length. For the cordon I used left over Kotiväki yarn as well as for the fringes left over Katia Brisa yarn.

Really quick and easy project. And I’m so happy with my new necklace.


18. maaliskuuta 2014

WTF?! No eases?!

I don’t use “eases” in my patterns, since I think it’s unnecessary. It’s just like with retail clothes; I think it’s up to the customer to make the decision about how loose or fitted they want the garment to be. If size M is too loose and the customer wants it to be more “hugging”, they’ll choose smaller size, size S. And again if size M is too tight for their taste, they’ll go for one size bigger, size L. – Or this is how it should be! Never choose a garment by the number on the size tag! Do it by the fit! – This is why my patterns have only the chest circumference of the finished garment mentioned: so that he knitters have themselves the option to choose what kind of ease is for their own taste. And since my patterns aren’t necessary made for any particular yarn, the ease depends also a lot on what kind of yarn is used to the garment: cotton doesn’t usually stretch as much as wool for example.

Lets’ take for example my Elly cardigan. I’ve knitted two different sizes: one for myself and one for my mum. For myself I made it in size S, with finished chest circumference of 80 cm -> my real chest circumference is about 78 cm, so the cardigan isn’t that tight on me. Especially since I’ve knitted it in wool blend that is really stretchy: I can stretch the cardigan up to 100 cm round the chest! But that is already way too tight. For my taste, that is. My mums’cardigan I made in size XXL, with the finished chest circumference of 118 cm -> if I remember right, mums’ chest circumference was the same… or maybe 117 cm, but almost the same anyway and it still isn’t too tight because of the quite stretchy yarn in wool blend. If I had graded the pattern for one bigger size, it would have been way too loose on my mum since it was meant to be a fitted cardigan.


I personally don’t like patterns with all kinds of eases. I only need the finished measurements of the garment and can calculate for myself how much ease I need to have for it looking good on me. 

25. tammikuuta 2014

Hakaneulat

Olen hakaneula-addikti. Neulominen ja neulesuunnittelu ilman Walter Huntin keksintöä voisi olla hermoja raastavaa… koska käytän niitä lähes kaikkeen mihin tarvitaan laskemista:

I’m a safety pin addict. Knitting and knit designing without Walter Hunts invention could be nerve-wracking… ‘cause I use them to almost anything that includes counting:
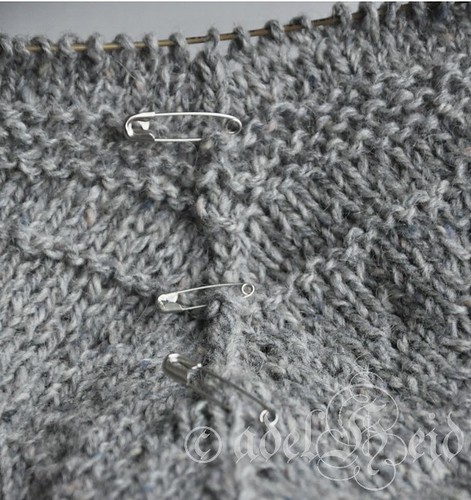
Kerrokset on niin paljon helpompi ynnätä yhteen, kun merkkaa hakaneuloilla esim. kymmenen kerroksen välein -> hakaneulojen määrä x 10:

Rows are so much easier to add up, if you mark every 10th row -> the amount of safety pins x 10:


Tai kun merkkaa lisäykset tai kavennukset, niin hakaneuloista saa nopeasti laskettua montako on jo tehtynä ja montako vielä uupuu:

Or when you mark increases and decreases, you can quickly add up how many is done and how many still left:
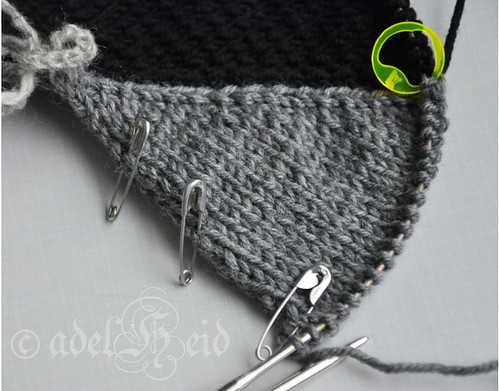

Päänteiden lyhennetyissä kerroksissa saa merkattua montako kertaa on jo neulonut ohjeen toiston:

To the short rows on the neckline, you can mark-up how many times you have already knitted the repeat in the pattern:

... ja tätä käytän myös ohjeiden kirjoituksessa; lasken työstä montako kertaa olen jonkin asian tehnyt ja saan kirjoitettua suoraan oikean luvun ohjeeseen.

... and I use this also in pattern writing; I count from the piece how many times I’ve done certain things and can directly write down the right amount to the pattern.
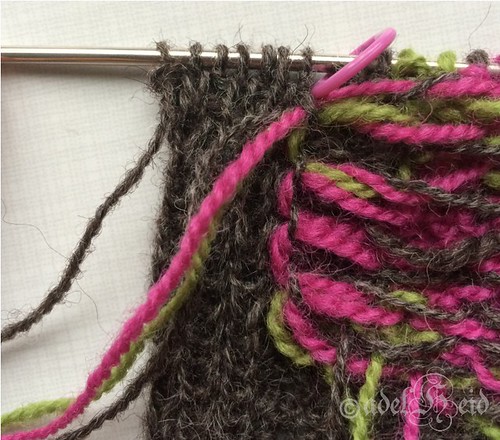
Hakaneulalla saa myös merkattua kätevästi kaavion raportin alkamis- tai päättymiskohdan, kappaleen keskikohdan tai keskimmäisen silmukan. Ne toimivat myös sovittaessa erittäin näppärinä väliaikaisina nappeina.

Ennen kuin löysin silmukkamerkit, merkitsin hakaneuloilla myös esim. suljetuissa neuleissa ”saumojen” paikat ja kerroksen alkamiskohdan.
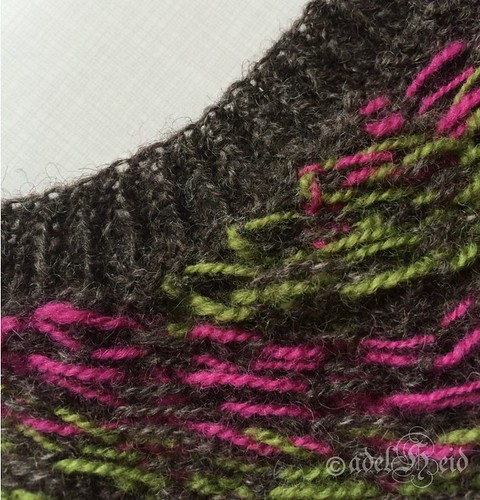
Värikkäät hakaneulat ovat oiva apu eri asioiden merkkaamiselle: kerrokset hopealla, lisäykset kullalla jne.

Siinäpä ihan muutama syy miksi suurin osa mun neuletöistä on aina täynnä hakaneuloja. Ja minkä takia hakaneulakokoelma on suht kattava :)

Safety pins are also handy for marking the start and end points of chart repeats and marking the center of a piece. When fitting, safety pins are also nifty temporary buttons.

Before I discovered stitch markers, I used safety pins also for marking “seams” when knitted in the round as well as the starting point of a row.

Colorful safety pins are excellent help for marking different things: silver for rows, gold for increases etc.

So there’s a few reasons why most of my knits are full of safety pins and why my safety pin collections is quite comprehensive :)